Why use it
The code selector allows you to fine-tune the selected element in Guides, Tooltips or Tags within your application. By manually defining the code selector, you can ensure it finds the desired elements accurately. It provides the necessary flexibility to adapt and adjust element identification to the unique structure of your application.
ℹ️ Some of these settings can be implemented through the UI. Read more about refining the selector here.
How it works
This article covers the following topics:
Troubleshooting Checklist
To quickly diagnose why a Selector cannot find or highlight an element, we have prepared a Selector Troubleshooting checklist. You can download here the Userlane Selector Troubleshooting Checklist.pdf.
Where to find it
For Guides, access a Step and click on Refine selector step option:

For Tooltips and Tags, click on the entry you wish to edit, open the Selected element section, and click on Refine selector.
Userlane Code Selector structure
Structure basics:

Red: The value for the code selector defines the highlighted element, e.g. a DIV box or an INPUT element.
You can separate multiple elements by space or greater than character (>). Doing so allows you to go one level deeper in the code structure (you select a more specific element within the bigger element).
Blue: The class of an element is added to the element with a dot (‘.’). If the element class has a space in its value, use another dot instead of the space. A space would mean to go an undefined level deeper in the code structure.
Yellow: The ID of an element is added to an element with a ‘#’ (see Example 1)
You can refine element selection with = or *=. If you apply `=`, the class, for example, must be exactly the value that follows `=`. If you add `*=`, the class must contain the value that follows `*=`(see Example 3).
orderNum defines the number of elements that match the code selector value. It starts with 0, so if the orderNum is 2, the third element that matches the code selector value will be chosen.
Example 1: General code selector structure with class and ID:
{
"selector": "DIV.element.class > INPUT#elementid",
"orderNum": 0
}
Example 2: Code selector structure with attributes
{
"selector": "INPUT[readonly=\"true\"].main-element",
"orderNum": 0
}
Example 3: Code selector structure with (stable) parts of attributes or classes
{
“selector”: “DIV[class*=CustomerSearch__InputContainer] INPUT[class*=SearchInput__StyledInput]“,
“orderNum”: 0
}
How to manually adjust the code selector
Change the value of an element
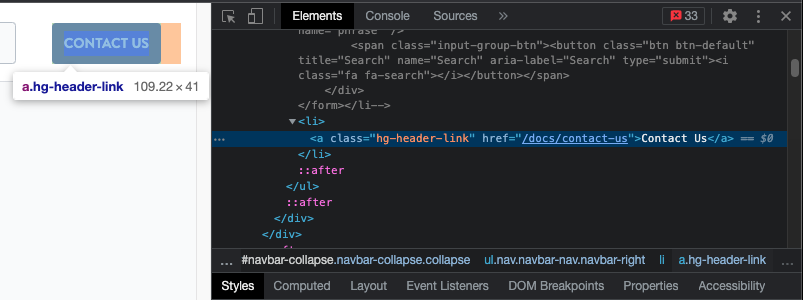
With the rules above, you can look up any element in your browser’s developer tools and define the code selector value. To get to the HTML code, you can right-click on the element and click at ‘Inspect’.
Example:
Add element text
You can modify the selector to ensure it chooses an element with that specific content or text. The detailed process is described in target specific text for an element with the content selector.
Example:
{
"selector": "label",
"orderNum": 1,
"content": {
"type": "contains",
"value": ["text-first-language", "text-second-language"]
}
}
This is a content selector with "type": "contains". Therefore, only a part of the element's text must be typed into the code selector. If you want to make sure that an element with the exact same text written in the element is selected, you can use a content selector with "type": "matches":
{
"selector": "label",
"orderNum": 1,
"content": {
"type": "matches",
"value": ["text-first-language"]
}
}
Adding a subSelector (e.g., for iFrames and shadowDOMs)
Userlane automatically detects if an application is built with iFrame or shadowDOMs and then automatically applies a SubSelector.
SubSelectors are useful for a more precise context based selector.
The detailed process how to create a SubSelector is described in the article on SubSelectors.
Example:
If there are many similar things on the page (like several “Edit” buttons), a sub-selector tells Userlane, “Choose the one that’s inside this section or row.”
Let’s assume:
The table has the class
customer-tableThe row you want has the class
row-customer-123Inside that row is an Edit button with the class
btn-edit
{
  "selector": "TABLE.customer-table TR.row-customer-123",
  "orderNum": 0,
  "subSelector": {
    "selector": "BUTTON.btn-edit",
    "orderNum": 0
  }
}
This could further be expanded with additionally using a Content Selector.
{
  "selector": "TABLE.customer-table TR.row-customer-123",
  "orderNum": 0,
  "content": {
    "type": "contains",
    "value": ["Customer Overview"]
  },
  "subSelector": {
    "selector": "BUTTON.btn-edit",
    "orderNum": 0
  }
}
Example for Iframe:
{
"selector": "IFRAME#same-origin-iframe-id",
"orderNum": 0,
"subSelector": {
"selector": "DIV.example.class",
"orderNum": 0
}
}
With this selector code, the Userlane selector would search for a DIV element with the class ‘example class’ (subSelector ), which is inside the iFrame element with the ID ‘same-origin-iframe-id’ (selector ).
Adding parentNum
ParentNum will take the selected element's ascendant (‘parent’). This is useful when you need to enlarge the highlighted area of a specifically defined element. This is also helpful for selecting elements bigger than the target element you want to highlight, especially when you want your Guide to appear visually more appealing. Here is a code example with parentNum value of 2 - it selects the ‘grandparent’ element (two levels up) of the targeted DIV-box.
Example:
{
"selector": "DIV.element-class",
"orderNum": 2,
"parentNum": 2
}
Ignoring Opacity
This is useful when some elements in your page have oppacity:0 until a user hovers over them. You can add this to your selector if you wish to have Userlane find the element even if it's not visible to the end user.
Example:
{
 "selector": "DIV > DIV > DIV > DIV > BUTTON > SVG",
 "orderNum": 0,
 "ignoreOpacity": true
}
Adding appendToTarget
This selector helps with issues related to the z-index settings of your application.
Z-index is a setting that decides which elements are in front on a webpage, with higher values moving elements to the front.
We calculate the z-index of the target element to ensure that different content types, such as Hints with icons or Beacons, are correctly displayed when end-users interact with the underlying app. However, there are situations in which the styling of the underlying app impacts the z-index calculation.
A consequence of this is having Tooltips with icons, Beacons and Guide steps displayed on top of elements of the underlying application e.g. for modals or dropdowns.
If that is the case, Managers can manually adjust the code selector value of the Userlane content type by appending it to the target element. Add the “appendtoTarget”: true key-value pair to the code selector to do that.
Selector Example:
{
"selector": "DIV.element-class",
"orderNum": 2,
"appendToTarget": true
}
The result:
 Before |
 After |
Add Selector Rules
At times when recording Userlane picks up elements where attributes are auto-generated and are not stable enough to ensure the Guide will always run smoothly. In order to ensure that the Userlane recorder picks up stable elements, you can create selector rules in the Userlane Portal.
This allows to insist on or block certain element attributes when recording elements. You can find this option under Application Settings > Selectors.

Note: Depending on the CSS styling of the underlying app, the Userlane content types may be impacted differently by having it appended to the target element. Therefore, we recommend testing this functionality using the Preview function for each Userlane content type before making the change available to all users.
💡Good to know
- The code selector can only be saved when the syntax is correct. We suggest you always copy-paste the examples from this article and then adapt the new selector so you do not forget a comma or quotes.
- Pick a stable selector. Choose an element that’s unique and unlikely to change.
- Test with different data/UI states. Ensure it works when rows are reordered or content changes.
