Who can create a new Guide?
Any user role can create a new Guide, but only Moderators and Admins can publish or edit active Guides. If you are new to creating Guides, we recommend that you review our best practices and have a clear plan of the tour or process that you want to capture.
Recording a Guide
To record a Guide, you need to access the record mode corresponding to the content type (e.g., Guide or Tooltip) that you wish to create. For Guides that can be accessed in two ways from the Editor:
- Select Guides from the left sidebar, and then click on the Create button
- Click the dropdown arrow (▾) next to the Create button
Guide record mode
Once you access the recording mode, a modal will pop up explaining to you what actions can be performed:

- Left click to create an interactive step: interaction steps require user interaction with your app, which is particularly useful for deeper product tours and learning processes.
- Right click to create an explanation step: the simplest Guides are a path of explanation steps where users click Next in your Guide to proceed.
- CTRL key to pause record mode
- ESC key to exit record mode.
- Don't show the modal again: the modal will not show up if checked.
Record a Guide
To create a Guide:
- Click Start Recording. The recorder captures every click you conduct and automatically creates a step. You can easily add steps to a Guide later if required.
- Click through the process you would like to guide your users through. You can add the text and change other options later.
- If you need to pause the recording to adjust your screen between steps, press the CTRL key. Press the CTRL button again to resume recording. This option works also when re-selecting elements.
- Once you have recorded the steps, click the Stop recording button or press the Esc key. Your recorded step sequence is displayed with the last recorded step selected.
Now that you created the flow to be performed by your users, let's configure the steps.
Step options
Once you exit the record mode, each step can be configured in various ways. For example, you can change the example title and text of a step directly in the window of the recorded step.
All step options are located right next to the step box:
Reselect Element
Here, you can reselect an element. This is useful if you have selected the wrong element by accident.
Alignment
Here, you can change the preferred alignment of your step box. This is where the explaining text box should be shown. You are selecting a preference only, as the optimal position can differ depending on your users' screen size or visible elements.
Refine selector
The features available in this section provide the necessary flexibility to adapt and adjust element identification to the unique structure of your application.
Skip
The Skip option allows you to make specific steps of your Guide optional for users.
If a step contains a Skip option, the Step will be represented in the Editor panel with a dashed line.
Step type
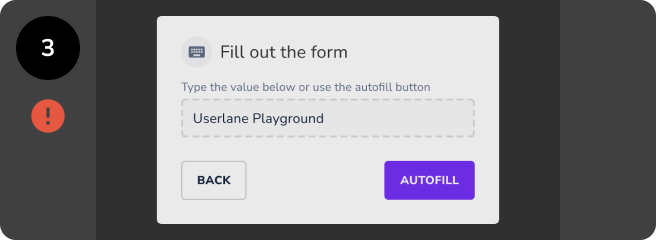
During recording mode, you can create interaction and explanation steps. However, there are scenarios where you may want users to perform certain actions before moving forward other than clicking on the element or pressing the "Next" button. For example, you may wish to validate inputs or automate specific steps.
To learn more about all step types available in Userlane, please check the following help article.
Interaction
You can define which type of interaction to apply for explanation steps:
- If allowed, users can interact with the highlighted elements without moving to the next step.
- If prevented, users cannot interact with any of the highlight elements.
Page reload
When a user does a full reload page, and the URL changes, or you move on to a new browser tab, you can set the option to ‘Yes’.
When moving on to a new browser tab, Userlane closes the Guide in the current tab without triggering an exit or an error and opens the Guide in the new tab.
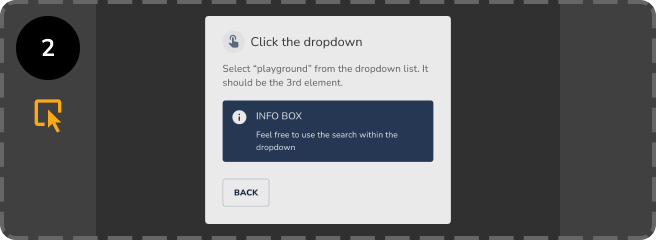
Add Media
Click the + icon to add a link, info box, image, or video to a step. See Adding media to your Guides to learn more.
Saving a Guide
After recording the Guide, hit the Save button, choose the corresponding name and Chapter, and apply the changes.
Edit a Guide
Once you access the Guide you wish to edit, the Editor panel will look like this:
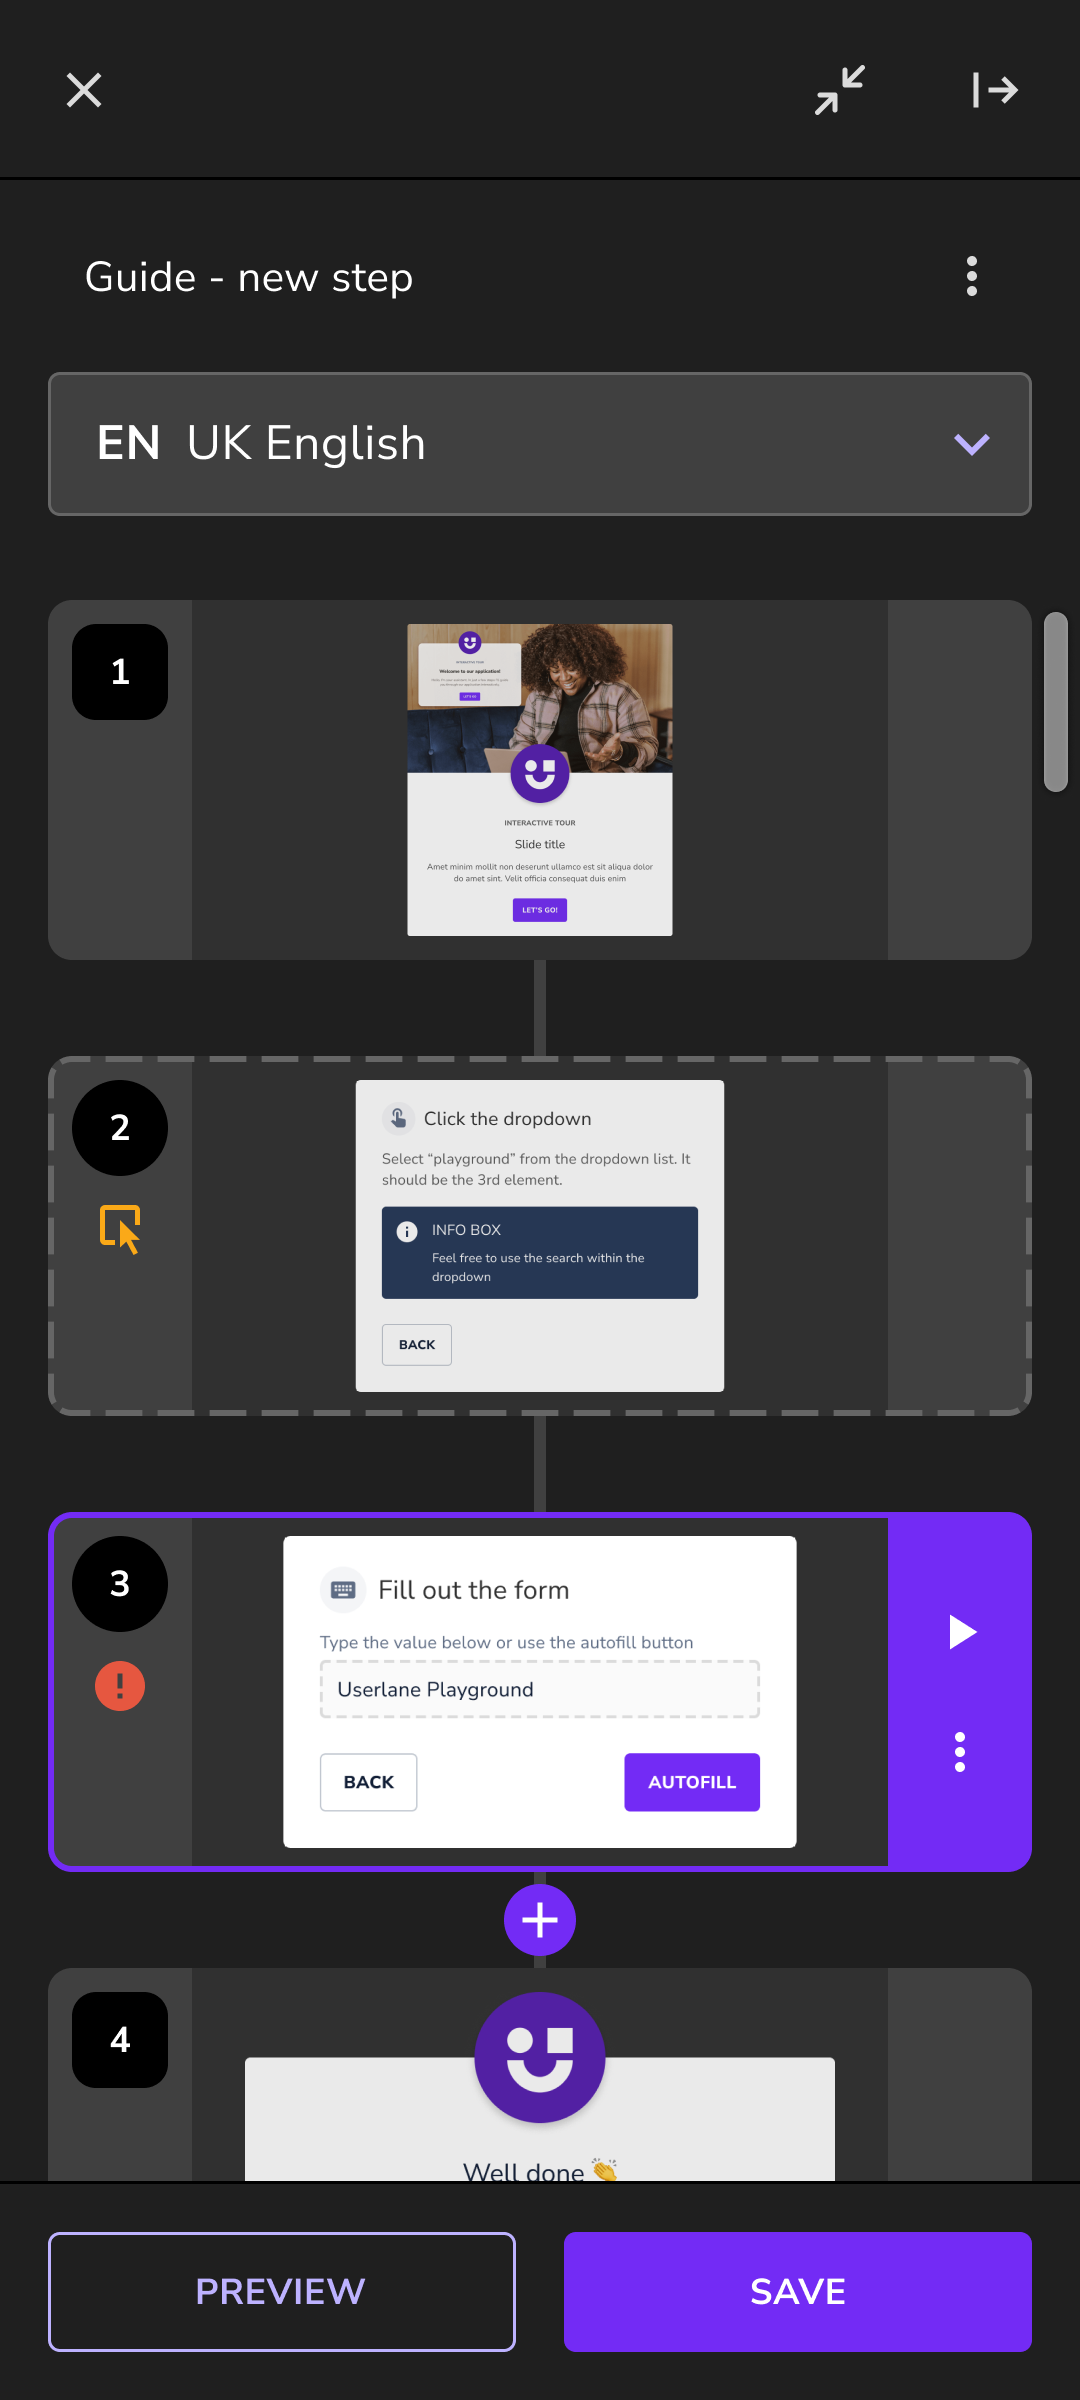
You can anytime access your Guide to add, edit, or remove steps. All possible actions are listed below.
Additional Guide actions
Next to the title of the Guide, click the More options (⋮) button that contains three actions:
- Auto-Translate Guide: The translate functionality button is enabled after the latest Guide changes are saved and the corresponding ISO code of your language is in use.
- Take screenshots: If you wish to export the Guide as a PDF, you need first to take screenshots of each step with the underlying app.
- Manage & Publish: Once done editing the Guide, click this button to be redirected to the Portal in a new tab. Here, you can segment the Guide and publish it.
- Analyze: once clicked, a new tab will be opened where you will be redirected to the Portal to visualize the analytics of the corresponding Guide.
- Delete: if clicked, you need to confirm once more that you wish to delete the Guide.
Edit the Guide content in different languages
Below the Guide title is a dropdown from where you can edit the text shown to the users who wish to consume the Guide in another language. To learn more about translation in Userlane, check the following article.
Add a step
You can add one or more steps at any point in your Guide if required. First, click on the step before the point you want to insert the additional step(s), and then click on the "plus" button located under that step to enter the Record mode.
Another option is to hover in-between step card panels and click the "plus" button to enter the Record mode.
Edit a step
To edit a step, you need first to select it. To do that, click on the desired step card panel and adjust the step options and content.
Preview a Step
Once you are done editing your Guide, you can either test it by pressing the Preview button next to the Save button or start testing a Guide by previewing it from a certain step (by clicking on the Play icon ▶ on the right side of the step card). For the latter, click on the step from where you wish to start the preview, and click the Preview button on the right side of the step card panel.
💡 You can preview your Guide anytime to review changes and language versions or to test links.
Learn more about the different ways you can test your Guides in How to test your Guides before publishing them.
Note: Segmentation applied to guides will not be active in the editor
Take screenshot of a step
If you wish to take a new screenshot of the step, click the step options menu which you can find under the three-dot (⋮) menu icon and then the New screenshot button.
Auto-translate step
If you wish to delete a step, click or hover it, go to the step options menu, and then click the Auto-translate step button.
Delete a step
If you wish to delete a step, click or hover it, go to the step options menu, and then click Delete step button.
Step notifications
Besides the step preview, the Preview from this step, and the step options menu, the step card panel includes two additional icons displayed on the left side under specific circumstances.
The orange icon is displayed when you are located on a page where the corresponding element of the step cannot be found (it is either on a different page or could be located in a modal or dropdown). It will also result in displaying a notification when previewing the Guide that the First Step is not found.
The red exclamation mark icon is displayed when Userlane requires your attention. It indicates that at least one warning was triggered due to multiple errors on the step and needs to be checked.
Note: If you want to learn more about building successful Guides, please check these best practices.
