About Announcements
Announcements are powerful push messages delivered through the Userlane Assistant within your application. With Announcements, you can directly communicate with your users and involve your audience early on.
With Announcements you can
- Communicate anything you want to your users directly in your app
- Get insights on the actual users’ needs, verify initial concept and goals
- Fill the gap within the content concept phase with relevant information and involve your audience at an early stage
When to use it
Before Rollout of Userlane:
- presenting and promoting Userlane as additional resource for support
After Rollout of Userlane:
- promoting specific Guides
- sharing resources, e.g. link to release notes, new URLs, best practice articles
- Share generic application-related information, e.g. downtime, responsible person shift, updates
- Share generic information, e.g. company news, reminder
Who can create Announcements?
Admins and Moderators can create, save, edit and publish Announcements in the Userlane Portal. Contributors can do almost everything, except that they cannot publish the announcement.
Create an Announcement
Go to your Userlane Portal. Navigate to Messages > Announcements.
Follow the steps.
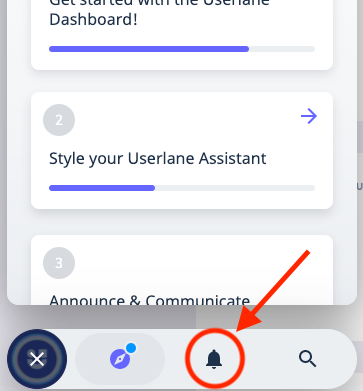
- Once you activate the Announcements for your end-users, the Bell icon appears in your Assistant. Through this bell, they will be able to reach the Announcement menu to find older announcements.
If you are not seeing the Announcement button within your Assistant, make sure to enable it in the Portal under Customize > Assistant.
Let's dive into the details
Announcement Status
- If you publish an Announcement, set it to private, and publish it again; it will only pop up for the users who didn't see it the first time.
- Once an Announcement pops up for a user it is considered as pushed. It won't pop up again for them.
- "Draft" refers to an Announcement that has never been published, while "used" refers to an Announcement, that was public once but not anymore.
Pushing more than one info at a time
- When a user is targeted for more than one Announcement for the first time they will see the last published Announcement first. Then they can click through the rest.
- Announcements vs. Promotions: Announcements and Promotions will never get mixed up. Announcements have a higher priority than Promotions.
- Announcements vs. Welcome Slide: the Welcome Slide is seen as an introduction element into the overall Userlane offering. When enabled, it will always be shown first when the user is targeted with any Userlane content (including Announcements) for the first time.
Adding and linking different content
- Images should be a maximum of 8 MB with a 4:2 ratio, and a recommended resolution of 326x160px. View more details on image requirements for your different content types in Working with images.
- If you link a Guide to an Announcement, we'll inherit that Guide's segment (yes you can also segment your Announcements!). However, you can change it.
- For users who can see the Announcement, but should not actually play through the linked Guide (e.g. not segmented for the user to see), we won't show the link button.
Pinning Announcements
You can pin one Announcement at a time to give it higher visibility in the Userlane Assistant. A pinned Announcement appears in a banner at the top of the Assistant in all menus, helping you draw more attention to important updates, reminders, or content.
Pinning can be done in two ways:
During Announcement creation or editing: In the Userlane Portal, while creating or editing an Announcement, simply select the pin option before publishing.
From the Announcements overview: Navigate to the Messages > Announcements section in your Portal. In the table overview, click the three dot menu next to an Announcement to quickly and easily pin or unpin an Annoucement.
Note: Only one Announcement can be pinned at a time. If you pin a new one, it will automatically unpin the previously pinned Announcement.
Translating Announcements
The easiest and fastest way to translate your Announcements into your target languages is to use the auto-translate function located to the right of the language selection dropdown.

After clicking the auto-translate button, your texts will be automatically translated into the target languages you have added to your Userlane Portal under Customize > Languages. If any of the language codes are incorrect, texts for that language will not be translated and the Announcement will be blank.
After using auto-translate, you can then check the translations by selecting a language from the dropdown. If you need to send the translated texts to a local market for review, you can also export all texts on the Customize > Languages page.
If you prefer to manually translate your Announcements, you can do so by switching between languages in the Announcement creation form or by exporting the source text and then importing your translations.
ℹ️ When using the export/import option, make sure you don't delete or adjust any of your source text as these changes will also be imported.
Note that you can only publish an Announcement for a certain language after text has been added.
Considerations
Don’t activate too many Announcements in parallel for your users, especially not for the same page segment. The more Announcements you stack, the less your users will interact with them.
ℹ️ Important
- If there are no Guides shown to a User because of their Segmentation but there is an Announcement active, the User will still see the Assistant with empty Guide list but with the Announcement in the Announcement list.
- Even if the Announcement menu is deactivated, if you publish an Announcement it will be pushed to the desired user segment. This makes it very easy to test and communicate information.
- When updating an existing announcement, a user who has already seen the announcement before, will not see the pop-up again. The user can review “seen announcements” though and see the updated announcement there.
